Information overload is one of the perils of working with lists of data in Microsoft Excel. There’s only so much information that we can comfortably work with in any given moment, which makes filtering a great tool for fighting back. The numbered steps in Figure 1 show you how to collapse a list down.

Figure 1: Excel’s Filter feature helps you combat information overload.
As shown in step 4, Excel adds an arrow to the top of each column. You can use these arrows to get a bird’s eye view of your data, as each filter drop-down shows you one of each item within that column. You can also use it to peruse columns of numbers, you’ll see the smallest number at the top, and simply scroll down to see the largest number.
Filtering is typically a manual process by way of the drop-down menus, but there are a couple of ways to speed up the process. Figure 2 shows that you can right-click on any cell, choose Filter, and then Filter by Selected Cell’s Value to filter data without using the drop-down menus. Or, as shown in Figure 3, you can create your own keyboard shortcut. When you add AutoFilter to your Quick Access Toolbar you can filter cell contents with a single click of the new icon, or by tapping the Alt key and typing the associated numeric shortcut. You can use these techniques in as many columns as you wish. Keep in mind though that the shortcuts only allow you filter for a single value in each column. If you want to filter for say apples and oranges together, you’ll need to use the drop-down menus shown in Figure 1.

Figure 2: Right-click on a cell to use a hidden short-cut menu related to filtering.
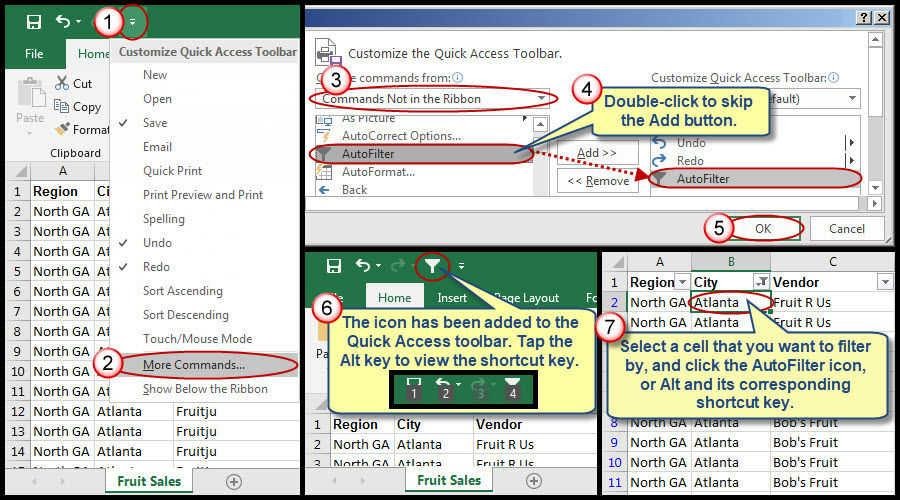
Figure 3: Turbocharge filtering by adding AutoFilter to your Quick Access Toolbar.